
“The smallest sprout shows there is really no death.” Walt Whitman Poetry collection Leaves of Grass.
Sprouts being consumed as food goes back a solid piece, in 2939 B.C. the emperor of China wrote about the versatile qualities of sprouts. If you fall in the space of vegetarian or vegan, you probably are well acquainted with sprouts and how they are a powerhouse of nutrition. These remarkable gifts of nature are pure, fresh, and nutrient rich, with their vital force intact.
If you have never tried sprouts and you are interested in experiencing the vitality they bring to the table, lets talk about making sprouts, they probably could really become the food of the future. Truth…. what food can be easily produced and enjoyed whether you are a toddler or 100 years old, living in an inner city high rise or living in the woods, off the beach; pick a spot. What food can be grown indoors with zero dirt required, can grow to maturity and harvested in two to seven days? What can supply your family with fresh vegetables year-round, regardless of the season? ANSWER: SPROUTS!
GOD’S GIFT OF NATURE
It is so easy, you simply begin with a small dry hard seed. add warm air and a bit of water and watch new life begin to grow from a dormant seed. In mere hours and at a cost to you of almost pennies, a shoot begins to grow, providing the most vital food ever.
As sprouts grow, they increase in nutritional content and this increase proves to be truly remarkable. the vitamin C that is sprouted in peas increases eightfold in four days. the vitamin B complex in sprouted wheat increases sixfold, and vitamin E increases threefold, in four days of sprouting.
The nutritional value doesn’t stop there. There are a host of minerals that abound in sprouts, and in an assimilable form. They provide a storehouse of enzymes, and all vegetables, nuts seeds, beans and grains begin their life as….. you guessed it a sprout!
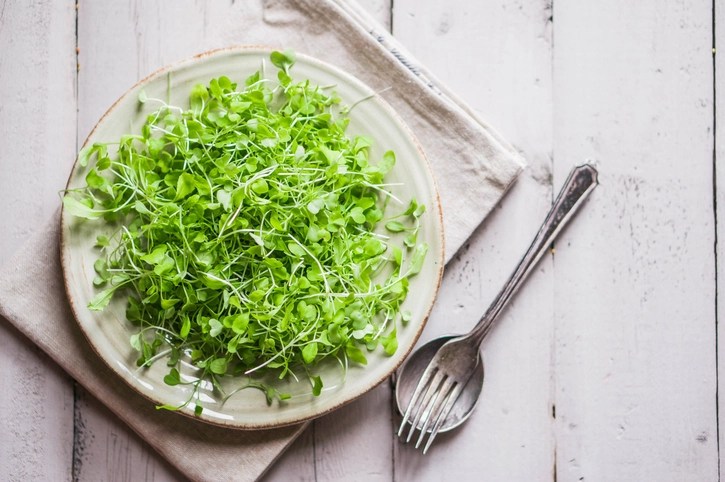
Homegrown sprouts are super fresh, and available to anyone willing to give growing them a “go”! Nothing compares to picking your own just before eating them and for me the best part is knowing mine are free from fungicides and insecticides. Yours would be too if grown in your home. When you eat sprouts, you are receiving the plant’s peak nutrition, like nature mobilizing all of its nourishment to bring forth a mature plant. Super cool stuff.
Try this, assuming you enjoy the flavor of almonds and sunflower seeds, soak them in filtered water for half a day, drain and eat them as they are. If you agree that simply soaking improves their taste and ease of digesting them, welcome to your new life as a gardener and sprout gourmet. Grains, beans and seeds are easy to sprout and delectable to eat. They range in shape and color from the brown lentil to the oblong sphere of the golden alfalfa seed. Everyone knows mung bean sprouts from Chinese recipes, but how bout sprouted rice? Ohhhh ever tried that?
In a simple glass canning jar, even a sprouting sack out of hemp can be used and they requires no sunlight or dirt, and with only a few minutes worth of work spread over three days, you can cultivate over thirty varieties of sprouts. you don’t have to work long and hard, sweating under the summer and fall sun, defending from insects or weeds. But you are able and assured that your harvest is organically grown, absolutely fresh and affordable, who doesn’t want to slash their food budget these days? If you do not have the desire or inclination to do your own sprouting in your kitchen, they can be bought at most grocery stores, natural food markets and health food stores that have a produce and refrigerated section.
All nuts, grains and beans are seeds of plants. every seed can create a new plant, and that plant creates a thousand new seeds, and those seeds produce whole fields and forests. This occurs in natures, but to imitate this process in your kitchen, you have to learn to control the air, water, darkness and warmth for germination to be a success.
LETS DIG IN
You will need some simple things to start – a container, air and water, darkness and warmth and seeds, grains, or beans. almost any container that permits drainage can serve as a sprouting vessel, including earthenware crocks, flower pots, bamboo trays, natural or nylon cloth bags, commercial sprouting trays and kits and colanders. Just no containers with aluminum or any metal prone to rust. The easiest to use is a wide mouth mason jar. You can also choose to invest in a sprouting container. On the frugal side repurposing a glass mayonnaise jar works too. Whatever jar or container you choose, it must be rendered drainable. You can perforate the metal cap by punching holes with a nail. the caps will tend to rust unless you lubricate with some olive oil on occasion. Instead of the metal cap, I have used cotton muslin, cheesecloth, and a fine wire screening secured on the rim of the jar with a rubber band. Putting your own mesh sprout tops together for mason jars are super quick and easy to make just remove the lids of the jar caps and retain the rings. Go to hardware store and purchase some nylon, copper or non galvanized window screen and use the lids as patterns for cutting circles out of the screen and insert the screen circles back into the rings instead of the lids.
You will need to consider the size holes in your screening to accommodate what you are sprouting as the size of the seeds will differ, so you will want different screen material for the different seed sizes. Sprouts are pretty hearty and can survive less than pristine conditions. If your tap water has lots of chlorine, however, set in an open container for a day or boil for a minute. The chlorine will dissipate. Personally, I prefer to use filtered water for sprouting. Room temperature is a crucial factor in determining the growth rate of the sprouts. It also affects how often you need to rinse them. for instance, three rinses a day for two summer days yields the same growth as two rinses a day for three winter days. The desirable rinsing frequency depends upon room temperature. If the room is too cold, place sprouts near a radiator, heating vent or fish tank, or in the warmest room of your home is best.
BUY THE BEST SEEDS, GRAINS AND BEANS
Where does one buy their seeds, grains and beans for sprouting? Regular supermarkets sell some but their whole beans are often irradiated or chemically treated to inhibit sprouting. if you try sprouting beans from local supermarket, you are likely to concoct only a soupy slime. Such beans are probably too low quality for sprouting, but still are food so don’t discard them. Cook those into soups, which is what they are sold for.
Garden seeds are dependably viable, but seldom edible. seeds intended for planting are treated with fungicides and insecticides, which, if eating in large quantities can make you sick. Untreated garden seeds, measured by the ounce, are usually priced high. I have found the most reliable source is through health food stores or mail order distribution or co-ops. the mail order specialize in seeds for sprouting. When I am sampling any new seed source, I tend to buy a small quantity, and I always buy organic. you might locate a bulk mail order bargain price for five pounds of say sunflower seeds, but if those seeds sprout poorly, then you’ve bought expensive birdseed. never stock more seed than you will need until the next fall harvest. that five pounds of sunflower seeds is no bargain if it last two years. Germination rates decrease every year. particularly every summer. The identical air, warmth and light that caused soaked seeds to sprout in a very short time cause stored seeds to deteriorate over a very long time. So in the case of sprouting seeds, hording MORE is not always a bargain unless you have a large family and will be sprouting a lot daily!
Always store un-hulled seeds, whole grains and dry beans in darkness, away from heat. Refrigerate hulled sunflower and pumpkin seeds, and shelled almonds and peanuts. Store in airtight, preferably glass containers. Most but not all plastic containers affect the smell of the air just as they do the taste of water. Particularly avoid plastic bags because they do a poor job of keeping insects either out or in.
HOW TO PROCESS
Now that we are ready to embark on the actual process of sprouting it is easier than most assume. I’ll walk you through sprouting alfalfa seeds, since most people know what alfalfa sprouts are. You want to measure two tablespoons of seeds, discard any stones or twigs or foreign matter that might be mixed in with the seeds. Place the measured culled seeds into the jar, fill the jar three quarters full with room, temp. water. Swirl the jar vigorously, or stir the seeds with a wooden spoon. Pour off the unidentified floating objects (UFOs). Some seeds may float to the top. These may be infertile and I usually discard them. Drain and fill the jar with water, and repeat this step until the water appears clear and the surface is free of UFOs. After the last clean drain, fill the jar one more time and cover with a screen top because air ventilation is important even at the submerged stage, alfalfa or clover should soak from three to eight hours, depending on the room temperature; the warmer it is, the shorter the soak time. For other seeds, soaking times will vary. An average soaking time is eight hours or overnight: a one night stand. Let the seeds stand in the water overnight and while you are sleeping your sprouts will be waking.
To drain the soaking water efficiently, select the proper size screen on jar top, choose a wide mesh for max. ventilation and drainage, but not so wide that you throw out the baby seeds with the bath water. For alfalfa, start with your finest mesh for the first two day, switch to a medium mesh for the third and fourth days. and graduate to the widest mesh for the fifth and sixth day.
Soaking water is rich in water soluble vitamins and minerals, so do not pour it down the sink. while bean water is unfit for usage, if you wish to remain sociable silent (gas), the grain and seed water are ideal for soups and sauces. Refrigerate what you do not use immediately or else it will ferment into a near beer. Feed the excess bean grain and seed water to your house or garden plants.
After draining the soak water, rinse the seeds, always using room temp. water. Cold will shock the sprouts: hot will kill them. To rinse, run the water along the inside surface of the jar (not directly onto the spouts), and fill nearly to capacity. Dislodge any seeds that stick to the upper part of the jar by gently twirling it. allow the seeds to remain submerged for a few moments, and then pour off the water. I always lean the jar against the side of the sink (in my dish drainer) to drip there for five minutes. and because water will continually collect at the bottom of the jar, you must devise a setup to keep the jar inverted at a slight angle until the next rinse. 8-10 hours later. If you lay the jar flat, a puddle will gather inside, which will cause rot, and crop failure. You can purchase jar holders now that rests the jar at proper angle for drainage which is convenient.
Small seeds, like alfalfa and clover, require twice a day rinsing. Large beans, dry out easily, so they require rinsing more often, four or more time a day. Don’t worry, after a couple weeks of sprouting you will be able to do this in your sleep. the routine will become habit and even enjoyable. I enjoy seeing the seeds and beans magically turn into edible, nutritious, and delicious food.
SUNNING & RINSING
On the fourth or fifth day, expose the now leafy alfalfa to indirect sunlight. Avoid dong so before the third day, or the sprouts will dry out from the heat of even indirect sun. Leafy sprouts like alfalfa, clover, broccoli, cabbage, kale, radish, spinach, mustard and turnip as well as the more difficult chia, cress, and flax, when exposed to light, will eventually develop chlorophyll. some times all you need is one day of indirect sun.
When your sprouts are fully grown, transfer them into a bowl filled with water. Place the bowl in the sink and loosen the clumps of sprouts from each other. you are combing out the hulls. Gently agitate and submerge the sprouts with one hand and let the hull float to the top or sink to the bottom. I remove the hulls and repeat as needed. This entire process, which may seem complicated when reading is really easy to do. After the sprouts are drained well, refrigerate them. (but never refrigerate sprouts that are dripping wet from the rinsing because they will turn mushy after one to two day). Thoroughly wash and dry the sprouting jar between each batch.
At this point, soak some more seeds. having several stages of sprouts going in the kitchen all the time, means you are then never without delicious sprouts to eat out of hand or add to favorite recipes. Tending sprouts should be a joy not a chore, grow them knowing you are supplying your family with healthy nutritious live foods!
Enjoy:
Dr. Jodi Barnett ND
Doctor of Naturopathy
Harvested Health LLC.

